
IP PBX FAQ
Small Office ScenarioConfiguration Tutorial

|
IP PBX FAQSmall Office ScenarioConfiguration Tutorial |

|
1. Planning
a. Introduction
Our example company has 5 employees incorporating two departments, Sales and Finance, and has two incoming numbers on a single SIP trunk from a Internet Telephony Voice Provider (ITSP).
The first step for a successful installation of a VoIP system is to perform a VoIP readiness survey to ensure that the broadband connection and network infrastructure is suitable for the deployment of the VigorIPPBX
A VoIP readiness survey will take into account factors that infulence the the call quality that users experience. These include delay, jittler, packet loss and available bandwdith. The Internet connection used should be known to provide a reliable service, low latency, adaquate bandwidth and low contention.
To conduct a VoIP readiness survey, tests should be conducted onsite to measure the factors mentioned above. In some cases it would be appropriate to use a VoIP testing tool, such tools are widely available . Some ITSPs may provide their own testing utilities, either as online tests or utilities. Separately ping and tracert tests to the chosen ITSP can confirm that the connection between the office's Internet connection and the ITSP's VoIP server is suitable. Ideally the ITSP VoIP server should not be a large number of hops away, and we'd recommend using a geographic local service (for example using a European based ITSP rather than one based in America) but this is not nessesarily a barrier to a successful VoIP installation. Indeed, in some cases using multiple ITSPs from a different reigon can allow call routing to avoid International call costs.
It is strongly recommended that the VoIP system installer sets out a plan describing the extensions, hunt groups and other information that will be used when configuring the IPPBX. Using a plan is quite benificial, both helping to reduce the time taken to complete the configuration and providing a permament reference of the installation that can be referred to and amended in the future.
Our suggestion would be to include a plan with the information that is laid out below. We'll use this information as the basis for the rest of the configuration in this tutorial.
Example Company Ltd planPhone Extensions
Number | Name | Phone IP Address | |
|---|---|---|---|
1001 | Adrian | adrian@example.com | 192.168.1.20 |
1002 | Becky | becky@example.com | 192.168.1.21 |
1003 | Claudia | claudia@example.com | 192.168.1.22 |
1004 | David | david@example.com | 192.168.1.23 |
1005 | Evan | evan@example.com | 192.168.1.24 |
Hunt Groups
Number | Department Name | Extensions |
|---|---|---|
201 | Sales | 1002, 1003 |
202 | Finance | 1004, 1005 |
Office Hours
Start | Finish |
|---|---|
9am | 6pm |
User Prompts
Prompt Name | Script |
|---|---|
Daytime Greeting | Hello, thank you for calling Example Company Limited. Please enter the extension number of the person you would like to speak to or alternatively please select from one of the following options. To speak to Sales, dial 1 To speak to the finance department, dial 2 For any other query please dial 0 |
Evening Greeting | Sorry Example Company Ltd are currently closed, if you would like to leave a message please dial 1 |
Prompt 1 | Sales Department, To track the status of an order, please dial 3 If you would like to speak to a representative, please dial 4 To return to the main menu, please press 9 |
Prompts 0, 2-9 | Not set |
Auto-Attendant
Option | Destination |
|---|---|
0 | Extension 1001 |
1 | Play Prompt 1 |
2 | Hunt 202 |
3 | Extension 1001 |
4 | Hunt 201 |
9 | Play Prompt 5 (Office Hours greeting) |
Once the planning it complete, we can move onto the configuration of the VigorIPPBX. We recommend setting the configuration is the order laid out below as it follows through in a logical manner and ensures that any pre-requisites for a specific function or component are configured first.
Our first installation step is to configure Internet access on the VigorIPPBX using the chosen method, in our example we are using an ADSL2+ line, but if ADSL / ADSl2+ isn't available then the WAN2 port could be used for other connection types that provide an ethernet presentation (for example connection to a cable modem or a device that is using a leased line)
Here we're setting Internet Access via [WAN]>[Internet Access]>[WAN1] and put in the correct DSL modem settings (VPI,VCI etc) for our ISP.
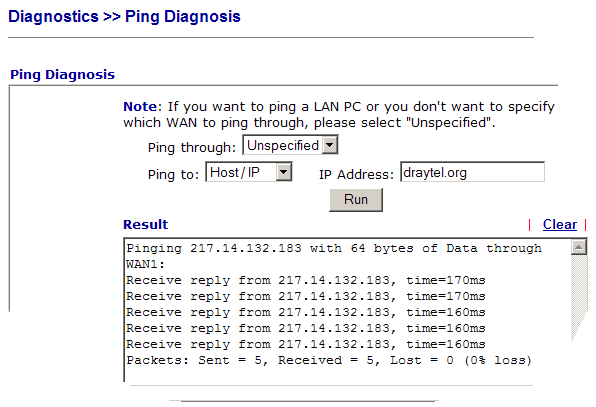
Once the IPPBX 2820 has obtained an IP Address and [Online Status] shows WAN1 in green it's worthwhile checking that the IPPBX 2820 is able to ping the Registrar / Proxy of the ITSP that is to be used.
This can be done via [Diagnostics]-[Ping Diagnostics]. If if the result give a ping reply then the Internet Access setup is complete. If the response is "could not find host" then check the DNS settings on the router (Displayed via [Online Status] or set in [LAN]>[General Setup] or [WAN]>[Internet Access]>[WAN1] ) and to make sure that they are correct.
One of the first things to configure in the IP PBX is the Voicemail. Decide what extension you want users to dial to pick up their voicemail and choose if voicemail messages are also sent via e-mail. In our configuration we have a local mail server on 192.168.1.254 and have added an account for the ippbx so that it can send voicemail.
Select Delete Voice Message after Sending Mail if you do not want users to pick up voicemail from their phones. The router will then automatically delete the message after e-mailing it to the e-mail address configured for the extension that has received the voice message.
Next we will setup our 5 extensions, one extension per phone. When choosing the extension numbers it's a good idea to choose a 4 digit number so that there is differentiation between the trunk, voicemail and hunt group numbers. In our example all our extensions are 4 digit numbers of the form 10xx.
Extensions are set via [IP PBX]>[Extensions]
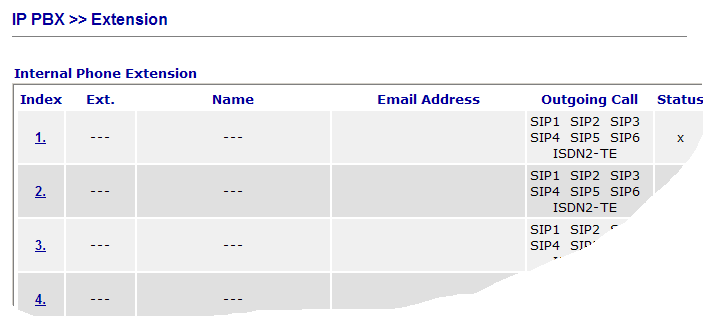
Click on the index number for each profile and enter the required details.
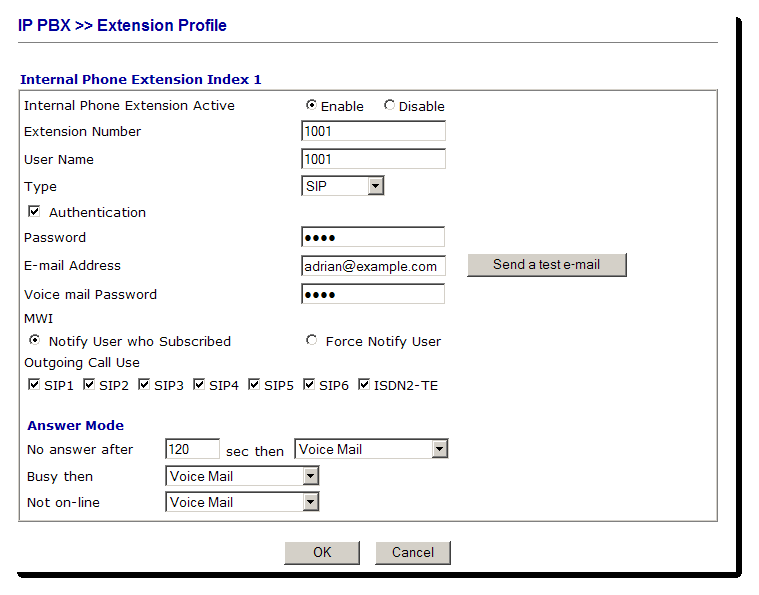
Extension Number : The number that someone would dial to call the extension User Name: Just a display name that is used as a reference E-mail Address : If voicemail is required, then enter the e-mail address of the user of the extension. The voicemail password is the password the user would use to access their voicemail. Outgoing Call Use : This specifies which trunks the extension is able to use for outgoing calls. It's only really required if restrictions need to be set on an extension so that it can't use a specific trunk for an outgoing call. Answer Mode : We can control the call handling for no answer, busy or offline modes. The options available are to Voice Mail, another extension or hunt group
We then setup the other extensions in a similar manner
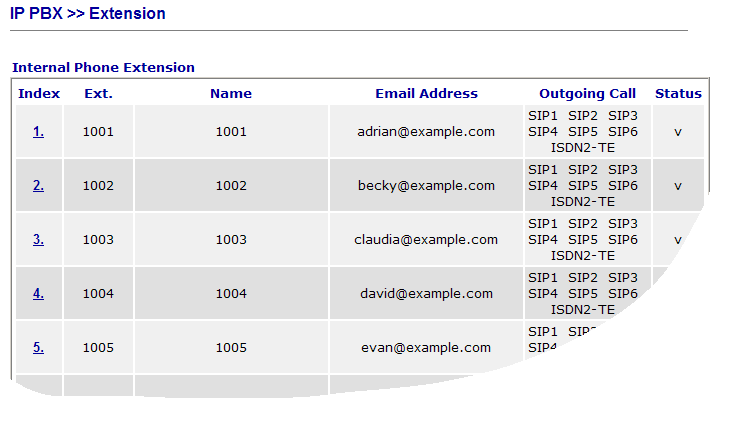
We can group the departments by putting the extensions into the same hunt group. Each hunt group has its own extension number that when called could be set to ring all extensions in the hunt group.
Hunt groups are configured in the [IP PBX]>[PBXY System]>[Hunt Group] menu.
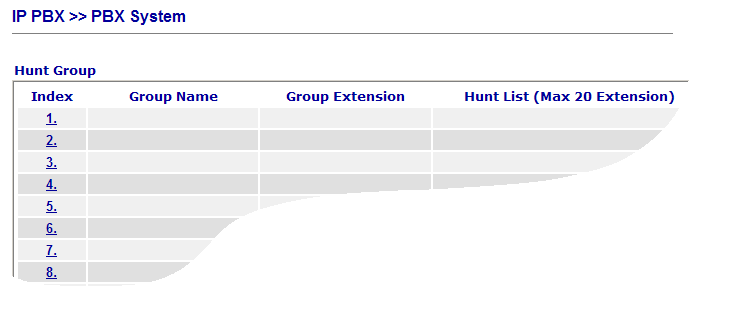
Select an index to edit a hunt group. It's best to name the hunt group by the department that it covers. The Hunt Group Extension is the number that can be dialled to call the Hunt Group. We're using three digit 20x numbers for Hunt groups so that it's easy to differentiate between User Extensions and Hunt Group Extensions.
The first hunt group is for the Sales Department.

Hunt Rule : There are two options for this. If set to Simultaneously, then the Hunt Group will ring all members of the group simultaneously. If set to Sequentially, then the Hunt group will ring extensions one at a time in the order listed.
We then do the same for the Finance department
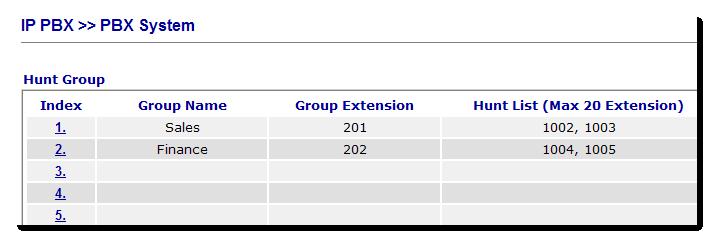
Now that we have our extensions and hunt groups configured the next step is to configure the different aspect of the PBX System itself.
The Office hours setting controls whether calls are answered using the office or out of office hours setting. The most common usage of this is with the auto-attendant for answering incoming calls.
In our example the office hours are 9am to 6pm, Mon - Fri; so we set the entry as required. If there are more complex office hours then more than one index can be configured.
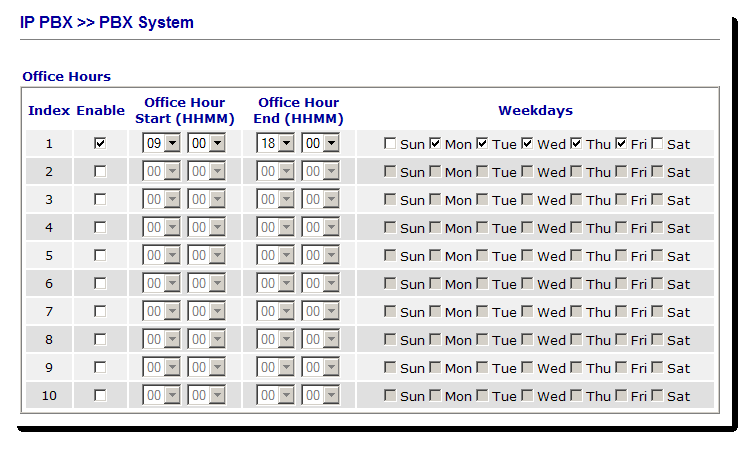
Another aspect of office hours is days when the office is closed, for example Bank holidays. In our example the company is closed for all Bank Holidays, so we have listed the Bank Holidays for 2010.
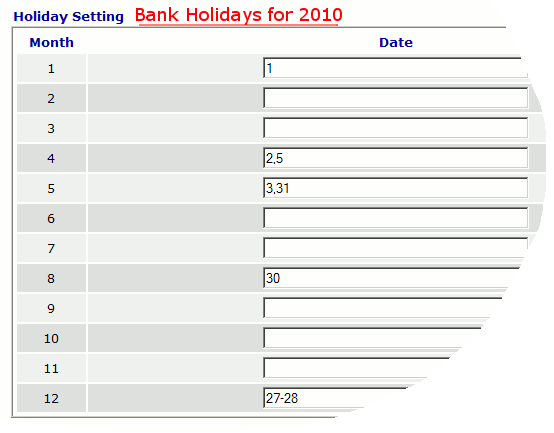
When entering multiple days in one month, put a '-' between the the start and end date if the days are in sequence (eg. 1-3 for 1st, 2nd and 3rd), or alternatively put a ',' between each day (eg. 1,3,4 for 1st, 3rd, 4th) . Both formats can be used in the same month.
The auto-attended automatically plays a greeting to the caller. The company greeting typically welcomes the caller and gives the caller options so that they can route their call to the appropriate department or person.
The auto-attended is split into two modes, office hours and non-office hours so we have the choice of having two different greetings if needed and can set behaviour of the 0-9 option choices.
After listening to the auto-attendant the user has two choices, either they can enter an extension number to call a users phone directly, or they can type an option number from 0-9 . What happens when they press the option depends on the configuration of the auto-attendant. Each option number can be configured to ring a specific extension, hunt group, or alternatively play a new prompt, which could have a different message. New prompts can be used to give the auto-attendant multiple-layers
i. Office and Non-Office Hours Greeting
The two primary user prompts are UserPrompt5 and UserPrompt6. UserPrompt5 is the default greeting for office hours and UserPrompt6 is the default greeting for out of office hours. This makes them the first prompt that a caller will typically hear.
We've writen out the script for the office hours and non-office hours greeting in our plan, so we just need to record the greeting to the VigorIPPBX's memory.
There are two ways to add UserPrompts. The first, and easiest way, is to connect an analogue phone to the analogue phone port and record directly using the IVR Configuration menu. The second way is to separately record a .wav file on a computer using a input device such as a headset or microphone and then upload the prompt using the Web Interface or FTP. We'll cover the analogue phone method in this tutorial, but both methods are explained in depth the FAQ.
Using an analogue phone, we dial **** to enter IVR Configuration menu and are greeted by the message "IVR Configuration, please input a valid value followed by the hash key."
To start recording the office hours greeting we then dial 1155# and immediately say our greeting script. Once we have finished the script, we press # to stop recording and we are then asked to press 1 to save the recording.
Note: Do not hang up the phone at this point, wait until you are returned to the IVR configuration root menu because the prompt is being converted and saved in the background
We can listen to the recorded greeting by then dialling 1255#
To record the non-office hours greeting, we repeat the process but dial 1156#
ii. Other User Prompts
The other User Prompts are recorded in the same way. Dial 1151 - 1160 , the last digit stands for the prompt number)
Our example uses User Prompt 1151 so we record that using the script we designed in the company plan
iii. Setting the Auto-Attendant
We configure the auto-attendant behaviour through [PBX System]>[Auto Attendant Wizard].
For an incoming call that has been answered by the auto-attendant, the destinations that the caller can reach is dependent on the configuration of each Key option. There are 10 Key options (0 - 9), each key can be configured perform a specific action if the caller presses the Key number.
The options are :
Ring Extension - The caller is transferred to the extension
Hunt Group - The caller is transferred to the hunt group
Play Prompt - The designated prompt is played to the caller. The caller can then press another option as directed by the prompt; this provides facility for a multi-layered auto-attendant.
Each Key only has only two settings, one for the office hours auto-attendant and another for the out of office hours auto-attendant. Alternatively, the caller can instead dial an extension number directly.
To understand our example, it's worth looking at the office hours prompt script again:
Hello, thank you for calling Example Company Limited. Please enter the extension number of the person you would like to speak to or alternatively please select from one of the following options. To speak to Sales, dial 1 To speak to the Finance Department, dial 2
If the caller dial 2 then they are transferred to the Finance Department Hunt group, but if the caller dials 1 then a new prompt is played:
Sales Department, To track the status of an order, please dial 3 If you would like to speak to a representative, please dial 4 To return to the main menu, please press 9
For any other query please dial 0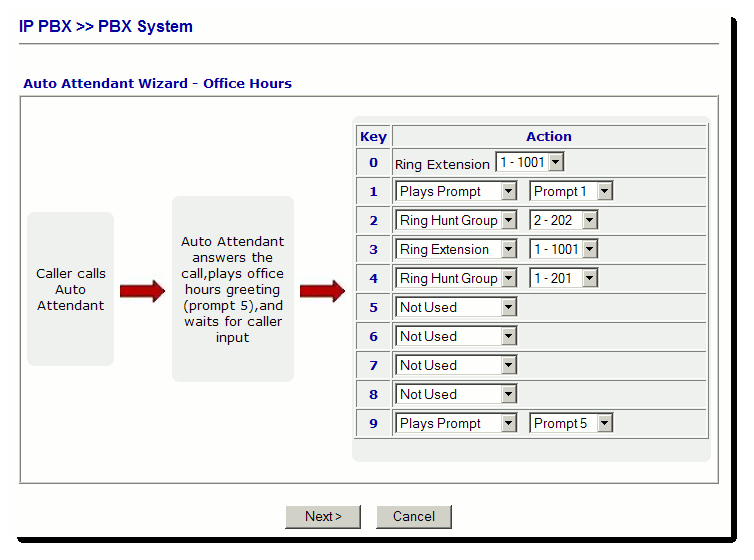
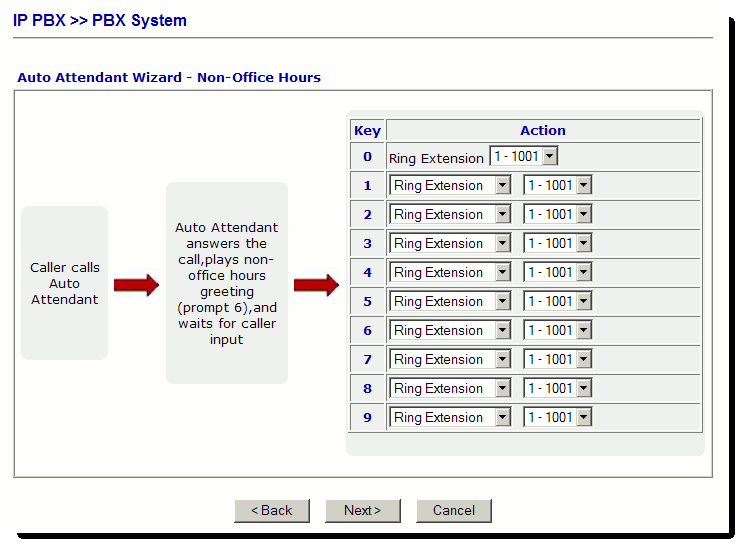
The out of office hours auto-attendant functions in the same way. For our example company we want it to just ring the reception, and if no one answers they'll be able to leave a message on the receptionists phone because we have set extension 1001 to forward to voicemail on no answer.
a. SIP Trunk
To setup the SIP Trunk, go to [IPPBX]>[Line Settings]>[SIP Trunk]. The VigorIPPBX can use upto 6 SIP trunks simultaneously. Each SIP trunk could be registered to a different ITSP, or alternatively more than one SIP Trunk could use the same ITSP.

Select an index to edit the details for a specific SIP Trunk. In our example we are using a SIP trunk with DrayTel but any ITSP that provides a SIP compliant service should be compatible.

Note: Please ensure that the SIP Local Port set in the SIP Trunk profile does not clash with the SIP Local Port value set in the [PBX System]>[SIP Proxy Setting] menu. We recommend setting the SIP Local Port to 5070 in each SIP Trunk.
The ITSP will provide the SIP details for the account.
We can set the behaviour for office hours and non-office hours mode. For our example we want the auto-attendant to answer in all cases. Alternatively it can be set to forward to extension or hunt group.
The Trunk Number is the extension number used for the trunk, and it is the extension number that a user would dial if they want to specifically use a line on the trunk. Normally the trunk that a user uses is selected automatically using the dial plans digit map setup.
b. Incoming Numbers
The way that incoming numbers are handled depends on how the ITSP deliver the call to the account. If the ITSP has setup the incoming number as a DDI then to route the call the Alias menu is used. The Alias menu is in the [IPPBX]> [SIP Trunk List] menu.

For each incoming number we can select the answer mode individually. So it is easy to route a specific incoming number directly to a Hunt Group instead of the auto-attendant.
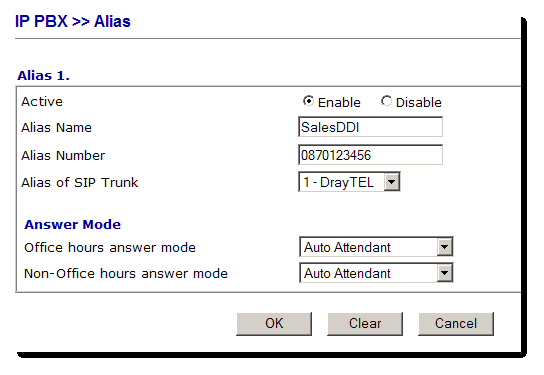
Alias Name - Description for the incoming number Alias Number - The number that is presented by the ITSP for the DDI Anaswer Mode - Auto-attendant, extension or hunt group
c. Outgoing calls (Digit Map)
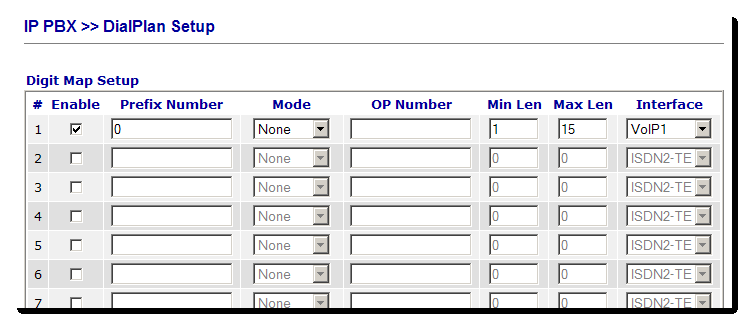
The digit map setup in [IP PBX]>[Dial Plan Setup] allows us to specify how outgoing calls are routed. The simpliest way to make a default rule so that all outgoing calls use a specific trunk it to add a digitmap rule in with a prefix of 0. This means that any number dialled that starts with a 0 will be routed out via Trunk 1.
A user could override the dialplan configuration and pick up trunk 2 by dialling 002# (or whatever the trunk numbers extension is) if they wish make an outgoing call via a specific trunk.
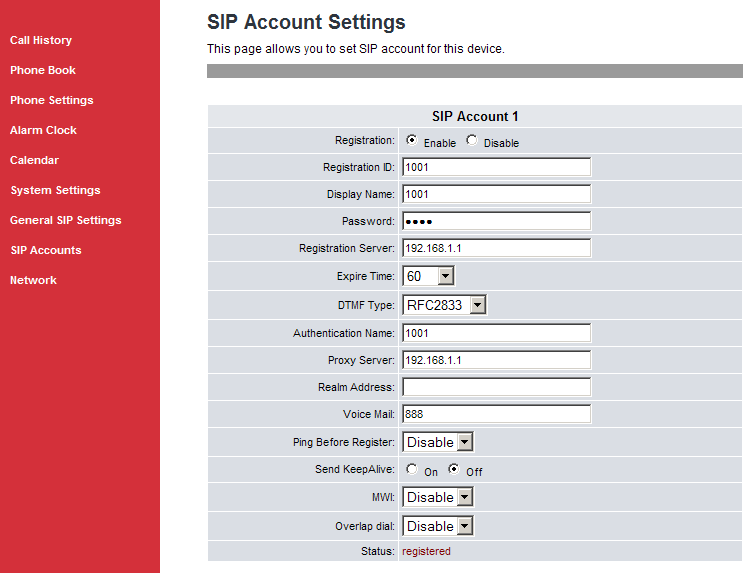
SIP Account setup for VigorPhone 350
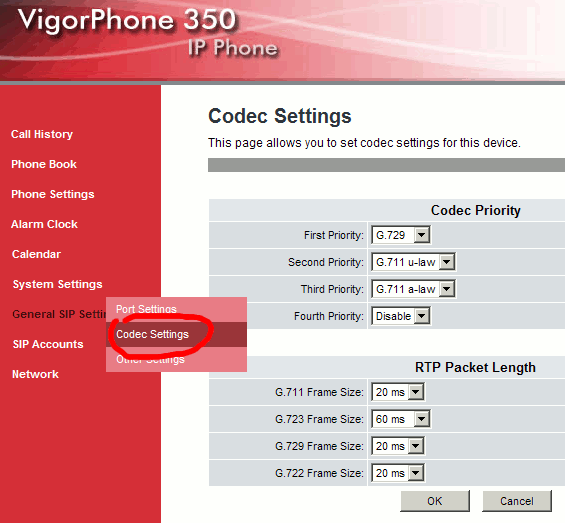
The choice of CODEC depends on the bandwidth that is available from the broadband connection. In this example we're changing the default Codec from G711 to G729 because it uses bandwidth but still provides good quality voice.
NOTICE : This document is © SEG Communications and may not be distributed without specific written consent. Information and products subject to change at any time without notice.