Wireless LAN
Universal Repeater Mode

|
Wireless LANUniversal Repeater Mode |

|
If the VigorAP700 is set to Universal Repeater mode then it can be configured to connect to and repeat a wireless connection. This can be used to increase the overall wireless coverage by locating the VigorAP700 at a position where its signal can be received in places where the original signal was weak.
In practice it is best to locate the VigorAP700 at a location that picks up a good signal from the original access point so that the quality of the connection between the two is good. This will allow a higher bandwidth link to the original access point and reduce the possibility of throughput issues because even if a WLAN client has an excellent speed connection to the VigorAP700, the actual throughput obtainable is determined by the connection speed betwwen the VigorAP700 and the original access point
After configuration of the VigorAP700 is complete, ensure that the LAN port of the VigorAP700 is not connected to the network, or an IP conflict will occur, as explained in the setup guide below.
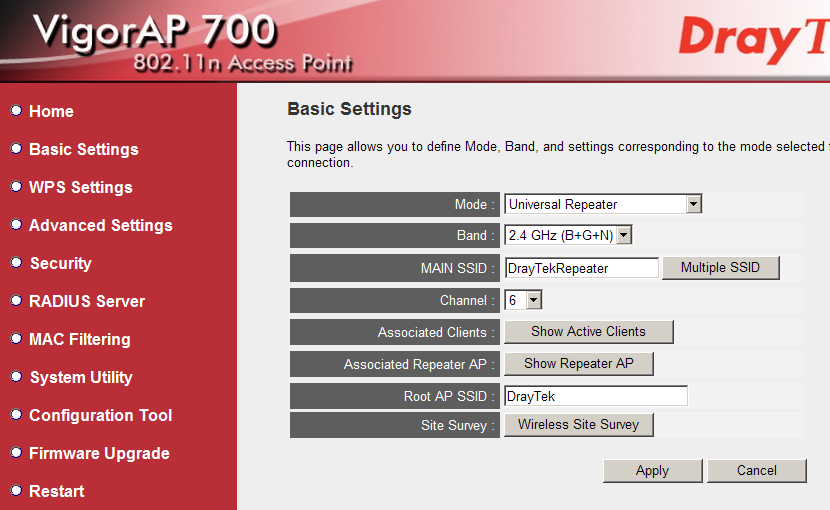
With the AP700 on factory default settings, connect it up to the router's LAN port and access the settings page. Change the mode to Universal Repeater.
The MAIN SSID will be the SSID shown by the AP700, you can set up multiple SSIDs if necessary.
The channel setting needs to match with the channel used by the wireless network that it is connecting to – please make sure that the wireless network it is connecting to is not set to auto-detect as this may cause it to change the channel when it detects the AP700.

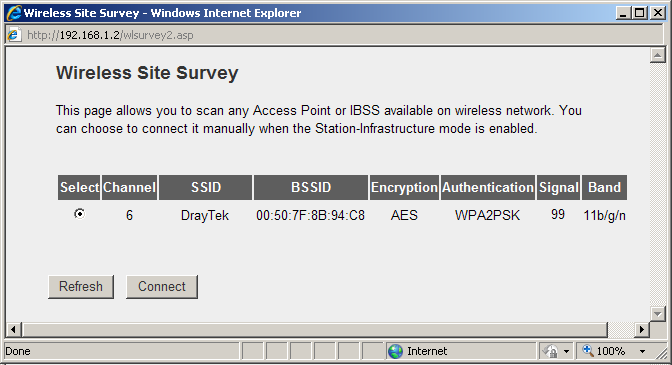
Click the Wireless Site Survey button and wait 5-10 seconds for the survey to complete, then select the wireless network that you want to connect to and click the Connect button. If the network you are connecting to hides its SSID, you will need to enter it manually as the Root AP SSID.

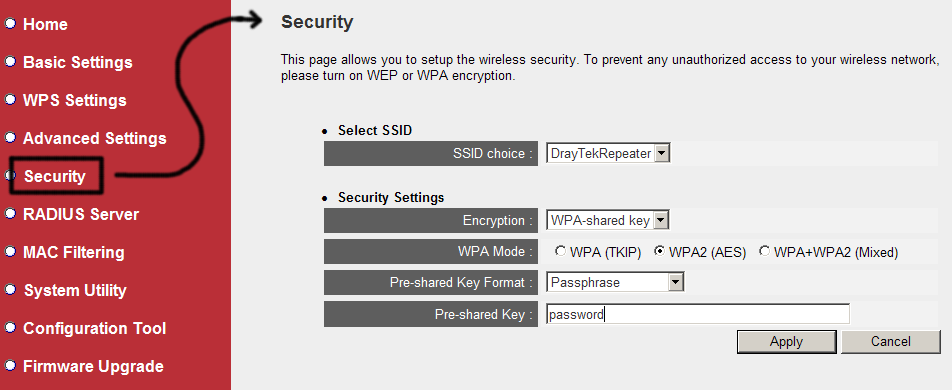
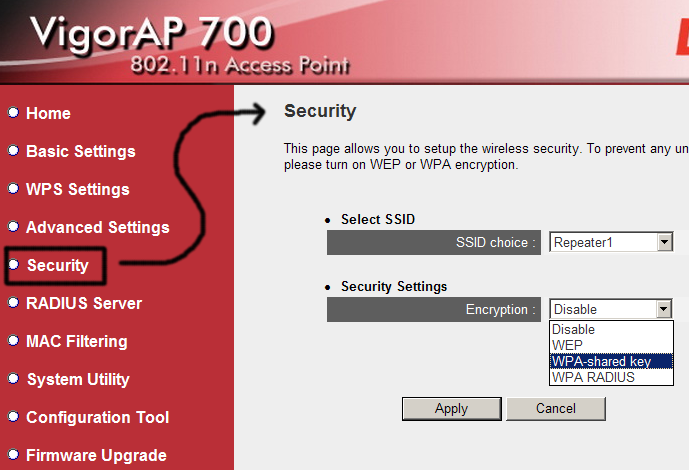
Once you have selected the wireless network you want to use, click Apply to save the settings then Continue so that you can then go to the Security page. On that page, select the first SSID and set up the security details to match those of the network it is connecting to. Then click the Apply button and Apply again on the next screen to restart the access point and apply the new settings.

Once the AP700 has finished restarting, you should disconnect the LAN cable from your wired network or you may receive an error message that there is an IP conflict. What this indicates is that the universal repeater mode is working and that it has created a network loop between the wired network and the wireless network. To fix this, unplug the LAN cable from the AP700 and restart it by unplugging its power for 5 seconds then reconnecting it. You may also need to fix this on the connected PCs by going to the Start menu then Run and in there enter “arp -d”


You should then be able to connect to the AP700's SSID or connect a computer/switch to its LAN port and be able to access the network that it is repeating. The AP700 should show a higher signal than the original SSID and provide better connectivity than connecting directly to the original SSID.

On the router that it is connecting to, you may want to use MAC address filtering, the AP700 will use a MAC address 1 digit higher than the MAC address listed on the base of the unit when used as a repeater. This changes if you enable multiple SSIDs on the AP700, in which case it will be up to 4 digits higher than the MAC address on the base depending on how many SSIDs you have enabled. The best way to check is to use the [Wireless LAN] > [Station List] page on the router that you are connecting to and looking at the MAC address on there.

You may also wish to use multiple SSIDs with repeater mode so that you can use additional security settings, to provide WEP compatibility for instance. To do that you would go to the [Basic Setup] page on the router and click the Multiple SSIDs button, then enable the additional SSIDs. Once enabled, you can then set the security settings for each SSID on the [Security] page by selecting the SSID.

NOTICE : This document is ©2010 SEG Communications and may not be distributed without specific written consent. Information and products subject to change at any time without notice.